Most mock codes end with a debrief that sounds like this: "I think we did pretty well. Compressions felt solid. Maybe we could have been faster with the epi." Then everyone nods and goes back to work, and six months later the same problems appear in a real code. The mock code did not fail because the scenario was bad. It failed because there was no data to point at, so the debrief became a conversation about feelings instead of a review of timings. Here is how to run a mock code that produces a timeline you can use.
The short version
Assign a dedicated recorder and timekeeper before you start. Run the scenario without stopping to teach. Capture first-compression time, pause lengths, time to first epi, and rhythm check intervals. Debrief immediately with the timeline in front of the team. Short and frequent beats long and annual.
What a mock code is for
A mock code is not a test. It is a rehearsal of the parts of a resuscitation that break under time pressure. Rhythm recognition, drug timing, role clarity, equipment location, and communication patterns all degrade when the room is loud and the clock is running. A mock code surfaces those failure modes in a controlled environment where you can stop, review, and fix them.
The goal is not to prove the team knows the algorithm. The goal is to identify the gaps between knowing the algorithm and executing it under conditions that resemble a real code. Does the team leader get drowned out by competing voices? Does the recorder lose track of timestamps because they are also drawing up medications? Does it take 90 seconds to find the IO kit? These are not knowledge problems. They are systems problems, and you cannot find them with a written test.
A well-run mock code produces two things: objective performance data that can be compared to benchmarks, and specific action items the team can address before the next real code. If your debrief does not produce both, the simulation was practice, not training.
In situ versus lab-based simulation
The choice between running a mock code in the actual clinical environment and running it in a simulation lab is a tradeoff between realism and control. Both have value. Most teams benefit from using both.
| Aspect | In situ simulation | Lab-based simulation |
|---|---|---|
| Location | Real clinical area where codes occur | Dedicated simulation center |
| Equipment | Real code cart, defibrillator, airway supplies | Simulation manikin and lab equipment |
| Team | Actual on-shift team that would respond | Often a training group or mixed participants |
| Realism | High for workflow, space, and equipment access | High for clinical realism and scenario complexity |
| Control | Lower; must work around patient care and clinical flow | Higher; full control of timing, environment, and distractions |
| Best for | Testing systems, equipment location, role handoffs, real team dynamics | Teaching new protocols, rare scenarios, extended debriefs |
In situ simulations surface latent safety threats that lab simulations miss. The code cart is in the wrong room. The oxygen outlet is blocked by a chair. The team leader cannot see the monitor from where they are standing. These problems are invisible in a lab but critical in a real code.
Lab-based simulations allow you to control the scenario, pause mid-code for teaching points, and repeat the drill without disrupting patient care. They are better for building foundational skills and practicing high-risk, low-frequency scenarios that would be difficult to stage in a clinical area.
Most programs run quarterly in situ drills to test systems and readiness, and annual lab-based sessions for deeper skill development and complex scenarios.
Before the code: setup, safety, and announcement
The minutes before you start the scenario determine whether the mock code will be useful or chaotic. Preparation matters more than the complexity of the scenario.
Clearly mark the drill as a simulation
The most important safety rule for an in situ mock code is that no one outside the simulation should believe it is real. Post visible signage at the entrance to the room. Announce over the radio or paging system that a code blue drill is in progress at this location. Use bright-colored vests or armbands for simulation participants. Some institutions use a visible "SIMULATION IN PROGRESS" sign on the door or a flag in the hallway.
The risk is not just confusion. The risk is that someone escalates a real response: calling a real code team, diverting a crash cart from another area, or pulling staff away from actual patient care. Prevention is simple. Make the simulation obvious.
Follow institutional simulation policy for equipment and medications
If your mock code involves real equipment or simulated medications, follow your institution's simulation policy. Real crash carts, defibrillators, and airway equipment can be used for training, but they must be immediately available for real emergencies. Do not lock out or disable equipment during a drill unless there is a backup available.
Simulated medications must never be confused with real ones. Use clearly labeled training vials, expired stock marked for simulation only, or empty syringes with tape labels. The Joint Commission and other accrediting bodies have explicit requirements for simulation medication safety. If you do not know your institution's policy, find out before you run the drill.
Decide whether to announce the drill in advance
Announced drills allow the team to prepare, focus, and practice new protocols. Unannounced drills assess real-world readiness and surface problems with response time and role assignment. Both have value. Use announced drills for skill-building and protocol rollout. Use unannounced drills for readiness checks and systems testing.
Regardless of whether the team knows the drill is coming, once it starts, make it clear to everyone in the area that this is a simulation, not a real event.
Assigning roles deliberately
Role clarity makes or breaks a resuscitation. A mock code is where you practice it. Assign roles before the scenario starts, and make sure everyone knows their responsibility. Do not let people self-assign mid-scenario.
The core roles are team leader, compressor, airway, vascular access, medication administration, recorder, and timekeeper. The most commonly neglected roles are recorder and timekeeper, which is why mock code documentation is almost always incomplete. Assign a dedicated recorder who has no other clinical responsibility during the scenario. Their job is to capture every event and timestamp as it happens. See the full breakdown in the code blue team roles guide.
The recorder should not have competing responsibilities
If the recorder is also managing medications, drawing up syringes, or assisting with procedures, the record will have gaps. Documentation quality improves when one person is dedicated to logging and nothing else. This is true in real codes and even more true in mock codes, where the goal is to capture data for the debrief.
The timekeeper may overlap with the recorder
In a small team, the timekeeper and recorder roles often fall to the same person. This works if the tool they are using keeps the clock and the record in the same place. A phone running a code blue timer can display both timers, log events with one tap, and timestamp every entry automatically. A wall clock and a paper form cannot. If you split the roles, make sure the timekeeper is calling out timestamps loud enough for the recorder to hear them.
Running the scenario: keep the clock honest
Once the scenario starts, resist the urge to pause and teach. Let it run. The teaching happens in the debrief, not mid-code. If you stop the scenario every time someone makes a mistake, you lose the time pressure, the communication breakdown, and the workflow chaos that are the actual learning targets.
Do not stop to teach mid-scenario
The most common error in mock code facilitation is stopping the scenario to correct a mistake or explain a concept. This destroys the realism and prevents the team from experiencing the consequences of their decisions. If someone gives the wrong drug, let the scenario continue and address it in the debrief. If the rhythm check is delayed, let it be delayed and show the team the timing afterwards.
The exceptions are safety violations or actions that would cause immediate patient harm in a real scenario. If someone is about to shock the manikin while others are touching it, stop and correct. Otherwise, let the scenario run.
Keep the clock honest
Do not compress time. Do not fast-forward through pauses. If the scenario calls for a two-minute compression cycle, run the full two minutes. If the team takes 90 seconds to place an IO, let the 90 seconds elapse. The time pressure is the point. Skipping it makes the mock code feel easier than a real code, which undermines the training value.
Provide realistic feedback at rhythm checks
At each two-minute pause, tell the team what rhythm they see and whether there is a pulse. Do not make them guess unless that is the learning objective. The goal of most mock codes is to practice executing the algorithm and managing the logistics, not to quiz rhythm recognition. If rhythm recognition is weak, address it separately with flashcards or a rhythm drill, not during a full resuscitation scenario.
What to capture during the mock code
The data you capture during the scenario becomes the foundation of the debrief. Without objective numbers, the debrief becomes a subjective conversation about what people think happened. With objective numbers, it becomes a review of actual performance against known benchmarks.
| Metric | What to capture | Why it matters |
|---|---|---|
| Time to first compression | Elapsed time from recognition of arrest to first compression delivered | Guidelines recommend compressions within 10 seconds of recognition |
| Pause lengths | Duration of each pause for rhythm checks, intubation, pulse checks, defibrillation | Pause duration is the primary driver of chest compression fraction |
| Time to first defibrillation | Elapsed time from recognition to first shock delivered in a shockable rhythm scenario | Early defibrillation is the single most important intervention for VF/pVT |
| Time to first epinephrine | Elapsed time from start of code to first epinephrine dose administered | Registry-reported metric and a common quality improvement target |
| Epinephrine interval consistency | Time between each epinephrine dose, compared to the intended interval | Tests the team's ability to maintain timing discipline under pressure |
| Rhythm documentation | Rhythm observed at each two-minute check, logged with timestamp | Determines algorithm adherence and appropriate shock delivery |
| Event spacing | Timestamps for all interventions: medications, shocks, airway, access, vitals | Shows the actual sequence and timing of team actions for debrief review |
These metrics are not arbitrary. They are the same metrics tracked in resuscitation registries and used by high-performing systems to drive improvement. If your mock code captures them, the debrief can reference real performance targets instead of vague goals like "we should be faster."
How MedCode fits into a mock code
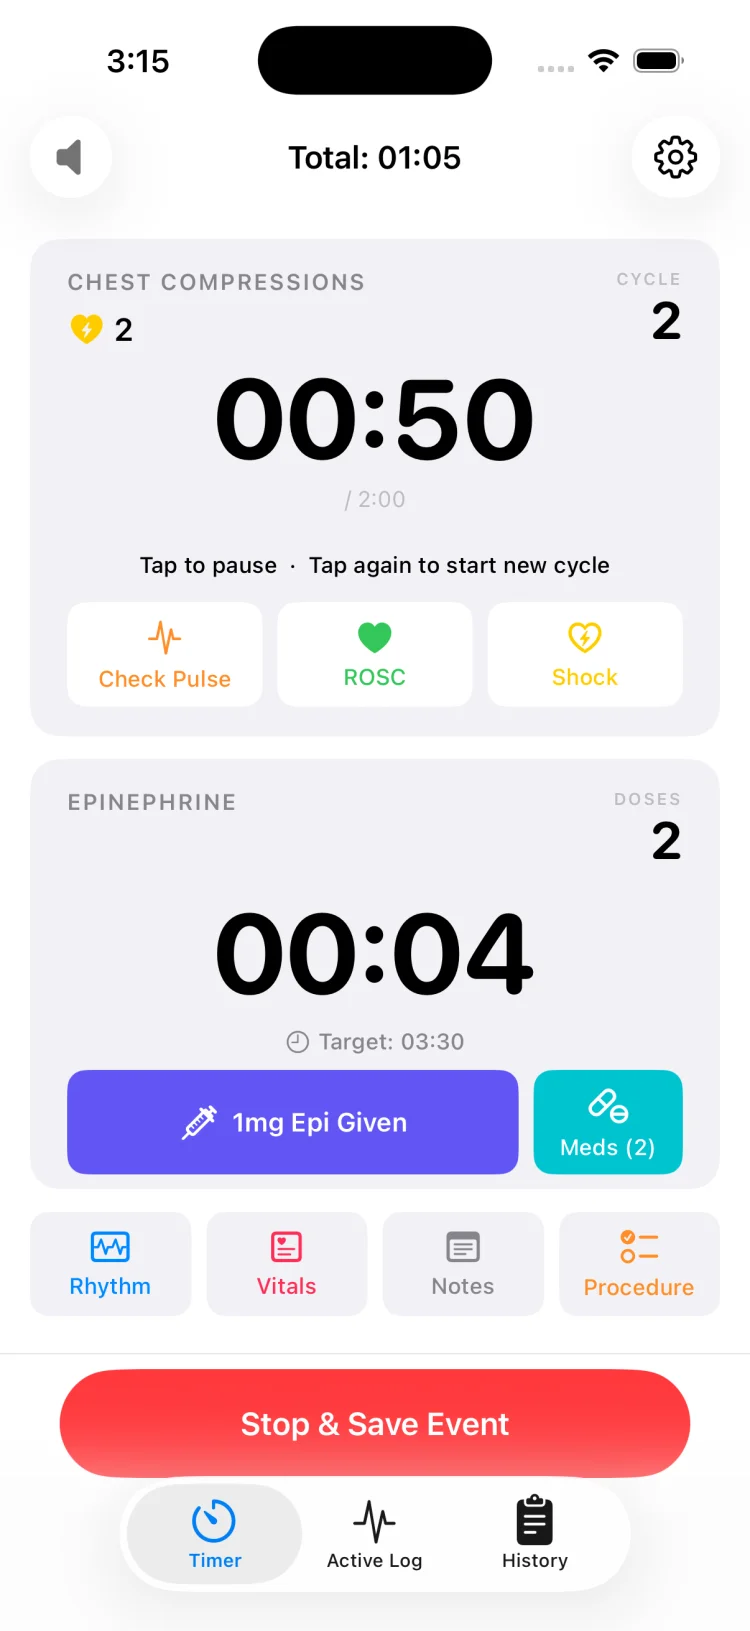
MedCode is a timer and documentation tool, not a simulation platform or scoring system. It does not connect to manikins, display scenarios, or grade performance. What it does is keep the clock and the record in the same place, which solves the two most common problems in mock code documentation: lost timestamps and incomplete event logs.
Two timers running together
The compression cycle timer alerts at two minutes for the rhythm and pulse check. The epinephrine interval timer alerts at whatever interval your team is using. Both run on one screen, visible to the team leader and the recorder. The facilitator does not need to watch a stopwatch and call out times. The app does it, and it repeats the alert until someone acknowledges it.
One-tap event logging with automatic timestamps
The recorder logs medications, rhythms, shocks, procedures, and vitals with one tap. Each entry is automatically stamped with both clock time and elapsed time from the start of the scenario. The record is written as the scenario runs, not reconstructed afterwards.
Metronome for compression pacing
The metronome provides an audible or haptic cue for the compressor, adjustable from 100 to 120 beats per minute. It plays over the silent switch so a flipped ringer does not cost you the beat. The metronome is not a feedback device. It does not measure depth or recoil. It is a pacing cue. See the compression rate metronome guide for why this matters.
Session history and PDF export
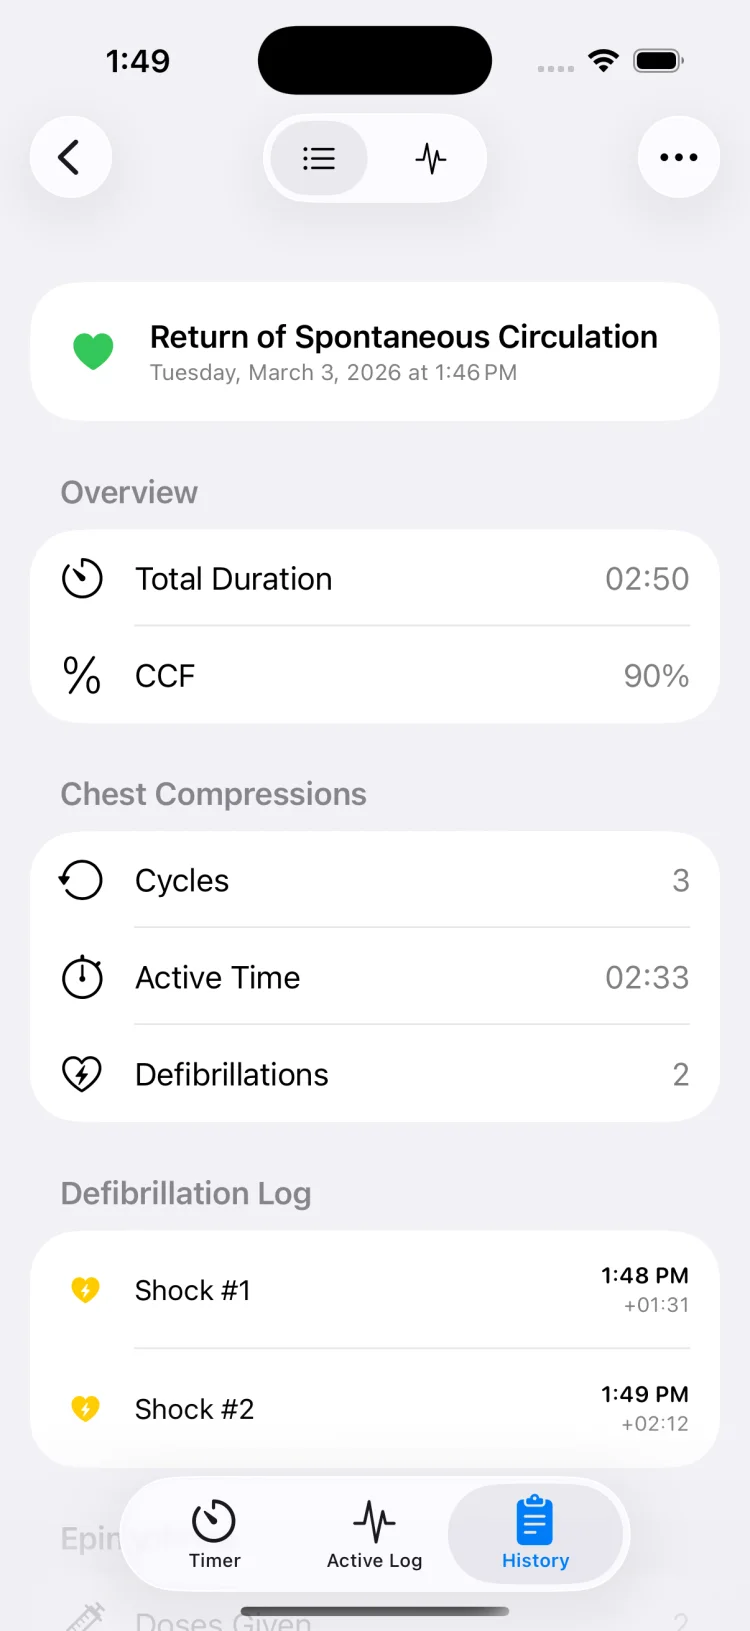
When the scenario ends, the session is saved to on-device history with the full timeline. Export it as a PDF in two formats: a chronological timeline showing every event with clock and elapsed time, or a summary grouping totals for medications, shocks, and rhythms. Share the PDF to print it, email it to participants, or project it during the debrief.
Using MedCode for a mock code
Run the scenario and capture the timeline without a separate recorder and stopwatch:
- Assign one person as dedicated recorder. Hand them the phone with MedCode open and the timers configured.
- Start the session when the team recognizes the arrest. The compression timer and epinephrine timer both begin.
- Log every event as it happens: medications, rhythms, shocks, airway, access, vitals. Each entry is timestamped automatically.
- Watch both timers on the main screen. The compression timer alerts at two minutes. The epinephrine timer alerts at your set interval.
- End the session when the scenario concludes. The timeline is already written and saved to history.
- Export the PDF and share it immediately for the debrief. Show the team the actual timings, pause lengths, and event spacing.
The debrief immediately after
The debrief is where the learning happens. Run it immediately after the scenario while the details are fresh. Use the timeline to ground the conversation in objective data rather than subjective recall. Keep it short. A good debrief takes five to ten minutes, not thirty. See the full structure in the code blue debriefing guide.
Start with what went well
Open with one or two things the team did well. This is not just positive reinforcement. It is pattern recognition. Identifying what worked helps the team repeat it. Did the team leader maintain clear communication? Did the compressor maintain rate without drift? Did the recorder capture every event? Name it, so the team knows what success looks like.
Show the numbers
Display the exported timeline. Walk through the key metrics: time to first compression, pause lengths, time to first epi, consistency of epi intervals, chest compression fraction if you calculated it. Compare the numbers to benchmarks. Guidelines describe a target of 10 seconds or less to first compression, pauses under 10 seconds for rhythm checks, and chest compression fraction above 80 percent. Show the team where they met those targets and where they did not.
Ask what the team noticed
Before you tell the team what you observed, ask them what they noticed. This shifts the debrief from a lecture to a conversation. "What felt smooth? What felt chaotic? Where did communication break down?" The team leader often has one perspective. The compressor has another. The person managing medications has a third. All are valid.
Identify one or two specific action items
End the debrief with concrete changes the team will make before the next drill or the next real code. Not ten things. One or two. "Next time, we will call out the epi dose out loud when it goes in." "Next time, the recorder will have no other role." "Next time, we will move the code cart to this side of the room so it is not blocked by the bed." Specific action items get implemented. General feedback gets forgotten.
Do not turn it into a lecture on the algorithm
If the debrief becomes a 20-minute review of the ACLS algorithm, you have lost the value of the simulation. The team already knows the algorithm. The mock code was about executing it under pressure. Review the execution, not the knowledge. If there are knowledge gaps, address them separately with a didactic session or an online module, not in the debrief.
Short and frequent beats long and annual
Skills decay. Research on procedural skill retention consistently shows that performance drops within weeks of training if the skill is not practiced. A team that runs one mock code per year will spend most of that year operating below competency. A team that runs a 15-minute mock code every quarter maintains readiness.
Quarterly 10-15 minute drills are more effective than annual hour-long simulations
Short, focused scenarios allow you to practice one or two elements without the logistics and time commitment of a full simulation day. Run a shockable rhythm scenario in one quarter, a non-shockable scenario the next quarter, a peri-arrest airway scenario the quarter after that. Each drill reinforces the fundamentals: role clarity, communication, timing discipline, and documentation.
In situ drills surface systems problems faster
You cannot find equipment location problems, workflow gaps, or role handoff failures in a simulation lab. You find them in the actual clinical environment where codes occur. Running brief in situ drills quarterly means you catch and fix those problems before they appear in a real code.
Track improvement over time
If you run the same metrics every quarter, you can track whether the team is improving. Did time to first compression decrease? Did pause lengths get shorter? Did epi interval consistency improve? If the numbers are not moving, the drills are not working, and you need to change your approach. Data-driven improvement requires data, and mock codes are where you get it.
Common mock code failure modes
Most mock codes fail for predictable reasons. Knowing the failure modes allows you to design around them.
No dedicated recorder means no usable timeline
If the person holding the clipboard is also drawing up meds, managing the airway, or compressing, the record will be incomplete. You will end the scenario with fragments and no timestamps, which makes the debrief a memory exercise instead of a data review. Assign a dedicated recorder before you start.
No clock means timestamps get reconstructed afterwards
If no one is watching a clock and calling out times, the timestamps on the record are estimates. "I think that epi went in around five minutes" becomes "5:00" on the form, and the data is useless. Use one clock for the room, visible to everyone, and log times as events happen.
Teaching mid-scenario destroys the time pressure
Stopping to explain a concept or correct a mistake mid-scenario removes the cognitive load and time pressure that are the actual training targets. The team does not learn to work under pressure if you keep removing the pressure. Let the scenario run. Teach in the debrief.
The debrief turns into a lecture
If the facilitator talks for 20 minutes about what the team should have done, the debrief is a lecture, not a learning conversation. The team will disengage. Keep it short, show the data, ask what the team noticed, and end with one or two action items. If you need more than ten minutes, you are doing too much.
Scenarios are too complex or too rare
A mock code that simulates a patient in DKA who arrests during intubation while the fire alarm is going off is not useful training. It is chaos theater. Most codes are straightforward: witnessed arrest, shockable or non-shockable rhythm, standard algorithm. Practice the common scenarios until the team can execute them without thinking, then add complexity.
Simulation safety and institutional policy
Mock codes involving real equipment, real clinical areas, or simulated medications must follow your institution's simulation policy. Clearly mark all simulations as drills to prevent escalation of a real response. Simulated medications must never be confused with real ones. Real equipment used for simulation must remain immediately available for real emergencies.
MedCode is a timer and documentation tool for resuscitation training and real events. It is not a simulation platform, does not connect to manikins or scoring systems, and does not provide clinical decision support. All scenario design, facilitation, and debriefing should follow your institution's simulation and resuscitation training standards.
MedCode is a practice and training tool. It is not a medical device, not clinical decision support, and not a substitute for your institution's required documentation or protocol. Any use during a real event is the individual clinician's own professional judgement.
Frequently asked questions
What is the difference between an in situ mock code and a lab-based simulation?
An in situ mock code takes place in the actual clinical environment where a real code would occur, using real equipment and the real team. A lab-based simulation takes place in a dedicated simulation center with a manikin, controlled environment, and often a different group of participants. In situ simulations surface workflow problems, equipment location issues, and communication gaps that lab simulations miss. Lab simulations allow more control, repeatability, and the ability to train scenarios that would be disruptive in a clinical area. Most teams benefit from both, but in situ drills are better at identifying systems-level problems.
How often should we run mock codes with our team?
Short, frequent mock codes are more effective than long, infrequent ones. A 10-15 minute scenario run quarterly keeps skills fresh and allows teams to practice specific elements without the time commitment of a full simulation day. Annual training is better than nothing, but the skills decay between sessions. Teams that run brief mock codes every three months show better retention of rhythm recognition, drug timing discipline, and role clarity than teams that train once a year.
What should we measure during a mock code?
Measure time to first compression, pause lengths for rhythm checks and procedures, time to first defibrillation attempt in a shockable rhythm scenario, time to first epinephrine administration, interval between epinephrine doses, and total chest compression fraction. These metrics are objective, reproducible, and directly tied to resuscitation quality. Showing the team their actual numbers in the debrief makes the feedback concrete rather than subjective.
Should we tell the team in advance that a mock code is coming?
It depends on your learning objectives. An announced drill allows you to assess performance when the team is prepared and focused, which is useful for practicing new protocols or testing equipment. An unannounced drill assesses real-world readiness and surfaces problems with response time, role assignment, and situational awareness. Both approaches have value. Most programs use a mix: announced drills for training and skill-building, unannounced drills for readiness assessment. Regardless of approach, always clearly mark the simulation as a drill once it begins to prevent escalation of a real emergency response.